Defining Purchasing Options
Use the Purchasing Options window to define default values and controls for functions throughout Purchasing. You can often override purchasing options when you are creating documents. You can define specific categories of options when you select one of the following:
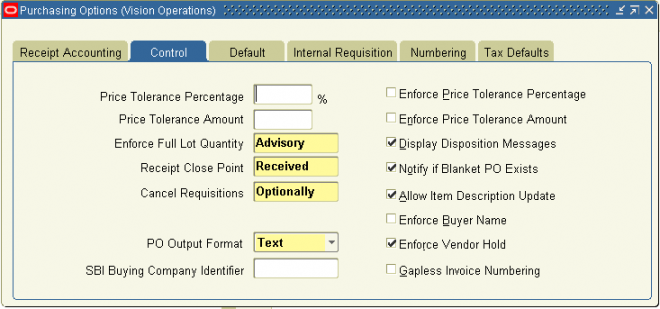
Defining Control Options
Note: If the price on a requisition line is zero, then price tolerance checks do not apply.
2. Select Enforce Price Tolerance Percentage if you want Purchasing to enforce the price tolerance percentage.
3. Enter the Price Tolerance Amount. This is the dollar amount by which the autocreated purchase order line price cannot exceed the requisition line price.
Note: If you set both price tolerance percentage and amount values, the system will apply the more restrictive of the two.
4. Select Enforce Price Tolerance Amount if you want Purchasing to enforce the price tolerance amount.
5. Select one of the following values for the Enforce Full Lot Quantity option:
None: The requisition quantity is not rounded to the lot quantity.
Automatic: The requisition quantity is forced to the rounded quantity.
Advisory: An advisory message suggesting rounding and a suggested rounding quantity are displayed, but you can override.
Enforce Full Lot Quantity is used for rounding quantities on Internal Requisitions, for example:
System Options Enforce Full Lot Quantities = Yes Items Rounding Factor = 75% Items Unit of Issue = DZ Unit of Measure on Internal Requisition = Each
If the user enters 6 Each on the Internal Requisition, the quantity will be rounding to 0. If the user enters 11 Each on the Internal Requisition, the quantity will be rounded to 12 Each.
6. Select Display Disposition Messages if you want to see any disposition messages defined against inventory items when they are placed on requisitions.
7. Select the Receipt Close Point, which is when the shipment is closed for receiving: Accepted (passed inspection), Delivered, or Received. Note that you need to set the receipt close tolerance percentage in the Default Options window.
8. Select Notify If Blanket PO Exists if you want to be notified of existing blanket purchase agreements when you create a requisition, purchase order, or blanket purchase agreement line for the item. If you sourced the item, you see the following message: Blanket purchase order [number] already exists for this item. Your requestors can directly create a release for the blanket purchase agreements instead of creating a requisition or purchase order if you allow your requestor to enter releases. See: Viewing and Responding to Notifications.
9. The Cancel Requisitions options apply only to requisitions from which purchase orders were autocreated. Select one of the following:
Always: When canceling the purchase order, Purchasing also cancels the requisition.
Never: When canceling the purchase order, Purchasing does not cancel the requisition, so it is again available for inclusion on a purchase order.
Optional: When canceling the purchase order, you are given the option to cancel the requisition. See: Controlling Documents.
10. You can define for each item whether you allow updating of the item description during the creation of requisition, RFQ, quotation, or purchase order lines. This update affects only the line you are creating. Select Allow Item Description Update if you want Yes to be the initial default of the Allow Description Update attribute when you are defining a new item.
11. Select a Security Hierarchy, which is a position hierarchy from the Position Hierarchy window. When the Security Level is set to Hierarchy for a document in the Document Controls window, this position hierarchy governs access security for the document.
Attention: This field is enterable only when the form is accessed from the Purchasing menu.
12. Select Enforce Buyer Name to enforce entry of only your name as the buyer on purchase orders. Otherwise, you can enter the name of any active buyer.
13. The PO Output Format selection defines the output format for purchase orders sent to the supplier using print, e-mail, or fax. It also enables functionality related to that output format.
PDF: Purchase orders are output in the Adobe Portable Document Format (PDF). You can view the purchase order fully formatted from the Enter Purchase Order window, Purchase Order Summary window, Change History page, Oracle iProcurement, and Oracle iSupplier Portal. You can also communicate the purchase order to the supplier from the Purchase Order Summary window.
Text: Purchase orders are output in text.
Note: Your ability to communicate the purchase order to the supplier from the Approval window remains the same with either setting. Only the formatting of the output changes.
14. Select Enforce Supplier Hold if you do not want to be able to approve purchase orders created with suppliers that are on hold. Use the Suppliers window to place suppliers on hold.
Note: Even if you put a supplier on hold in the Suppliers window, you can still approve a purchase order to that supplier if Enforce Supplier Hold is not checked here.
15. If you have selected Gapless Invoice Numbering for the entire business unit or for a specific supplier site, enter the SBI Buying Company Identifier, which is an identifier included in the invoice number created by the Pay on Receipt process. This portion of the invoice number identifies the buying business unit and for invoices is combined with the prefix defined by the PO: ERS Invoice Number Prefix profile.
16. Select Gapless Invoice Numbering to enable gapless (no breaks in numbering) invoice number generation for your buying organization during Pay on Receipt processing.
Receipt Accounting Options
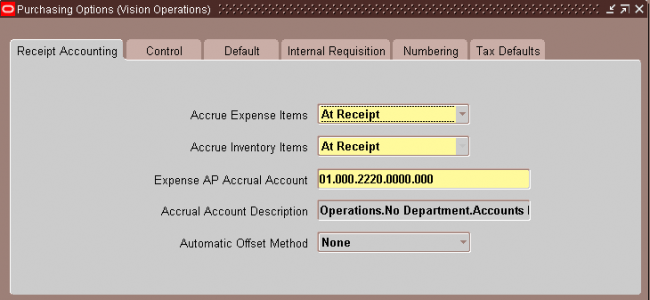
At Receipt: Accrue expense items upon receipt. You can override this flag in the Shipment Details window when you are entering purchase orders and releases.
Period End: Accrue expense items at period end.
Attention : When using Cash Basis Accounting, you should set this option to Period End, but you will not normally run the
Receipt Accrual – Period End process.
2. For Accrue Inventory Items, you currently have only one choice: On Receipt.
3. Enter the default Expense AP Accrual Account.
4. An offset is an accounting entry that is created to offset, or balance, another accounting entry. Automatic Offset Method is the method used to automatically create the account for the offsetting transaction. Here the offsetting account is the Receiving Inspection Account, which offsets the Accrual Account transaction at the time of receipt and the Charge Account at the time of delivery. The Automatic Offset Method controls which of the two accounts are used as the base account and which as the overlay account, as well as which segment is used to overlay the base account segment.
Choose one of the following Automatic Offset Method options:
None: No substitutions are made and the Receiving Inspection account for the destination organization is used.
Balancing: The base account is the Receiving Inspection Account for the destination organization and the balancing segment is overlaid with the balancing segment of the Charge Account.
Account: The base account is the Charge Account and the account segment is overlaid with the account segment of the Receiving Inspection Account.
Defining Default Options
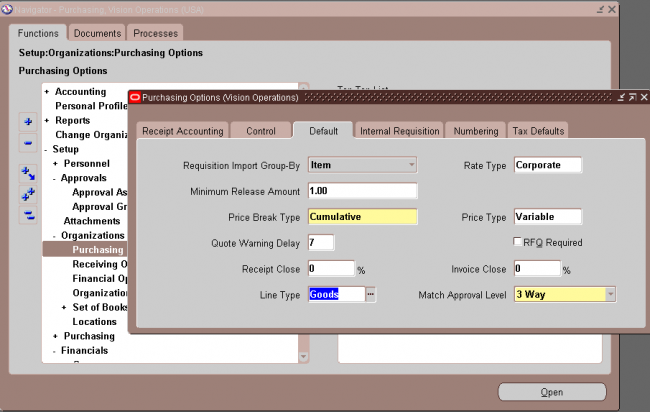
1. Select one of the following Requisition Import Group By options for requisitions imported through the requisition open interface:
All (not grouped), Buyer, Category, Item, Location, or Supplier.
2. Select the currency Rate Type that defaults on requisitions, purchase orders, RFQs, and quotations. If the Rate Type is User, you can override this default for each document line. If either your functional currency (defined in your set of books) or your transaction currency (the currency you enter in a purchasing document window) is Euro (the European Monetary Unit currency), and the other is another European currency, Purchasing defaults in the appropriate conversion Rate Type, Rate, and Rate
3. Enter the Minimum Release Amount that defaults on blanket, contract, and planned purchase orders. This amount is in your functional currency.
4. Select the Price Break Type that defaults on blanket purchase orders:
Cumulative: Price breaks apply to the cumulative quantity on all release shipments for the item.
Non–cumulative: Price breaks apply to quantities on individual release shipments for the item.
5. Select the Price Type that defaults on purchase orders. Use the Lookup Codes window to define price types.
6. Enter the Quote Warning Delay. This is the number of days before a quotation expires that you want to receive an expiration warning. When a quotation is due to expire within the number of days you provide here, you receive the following message in the Notifications Summary window: Quotations active or approaching expiration: [number].
7. Select RFQ Required to require an RFQ for an item before you can autocreate the corresponding requisition line onto a purchase order.
You can override this value for each item or requisition line.
8. Enter the Receipt Close tolerance percentage for your shipments.
Purchasing automatically closes a shipment for receiving if it is within the receiving close tolerance at the receiving close point. Set the receiving close point in the Control Options window. You can override this option for specific items and orders.
9. Enter the Invoice Close tolerance percentage for shipments. Purchasing automatically closes a shipment for invoicing if it is
within the invoicing close tolerance at billing, when Payables matches invoices to purchase orders or receipts. You can override this option for specific items and orders.
10. Select a default Line Type for requisition, RFQ, quotation, and purchase order lines. When you create any of these documents, the line type is part of your item information. You can override the line type for each document line.
Attention: This field is enterable only when the form is accessed from the Purchasing menu.
11. Select one of the following options for Match Approval Level:
Two–Way: Purchase order and invoice quantities must match within tolerance before the corresponding invoice can be paid.
Three–Way: Purchase order, receipt, and invoice quantities must match within tolerance before the corresponding invoice can be paid.
Four–Way: Purchase order, receipt, inspection, and invoice quantities must match within tolerance before the corresponding
invoice can be paid.
Note : The Invoice Match Option in the purchase order Shipments window and the Match Approval Level here are independent options. The Invoice Match Option determines whether Payables performs invoice matching to the purchase order or the receipt. You can perform whichever Invoice Match Option you want on a shipment regardless of the Match Approval Level you choose here.
Tax Defaults Options
The tax defaults you select in this window are used in the following windows and processes in Purchasing:
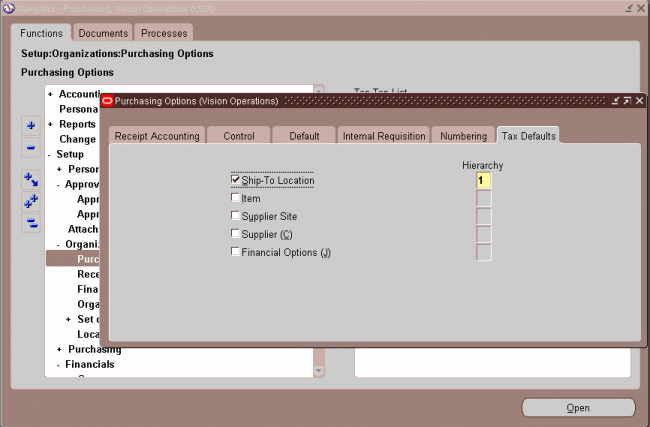
A Tax Code defined in the Purchase Order Preferences window overrides any tax defaults you set here.
Check one or more of the tax defaults sources from which your purchasing documents default tax codes.
Supplier – The tax code defaults from the Invoice Tax Code value in the Invoice Tax region of the Suppliers window.
Supplier Site – The tax code defaults from the Invoice Tax Code in the Invoice Tax region of the Supplier Sites window (accessible from within the Suppliers window).
Ship–To Location – The tax code defaults from the Tax Code you entered in the Location window.
Financial Options – The tax code defaults from the Tax Code in the Financials Options window.
Item – The tax code defaults from the Tax Code value you entered in the Purchasing region of the Master Item or Organization Item windows. The tax code defaults first from the item and the ship–to organization, if available; if not, it defaults from the item and inventory organization.
In the Hierarchy column, enter a ranking number (starting with 1) for each of the tax defaults sources you checked (even if you checked only one).
For example, you may check Item, Supplier Site, and Supplier and rank them 3, 2, and 1 respectively. This means that when your purchasing documents default tax information, they look first for tax information from the supplier; if that tax information is not found, they look next for tax information from the supplier site; if that’s not found, they look for tax information corresponding to the item
Internal Requisition Options
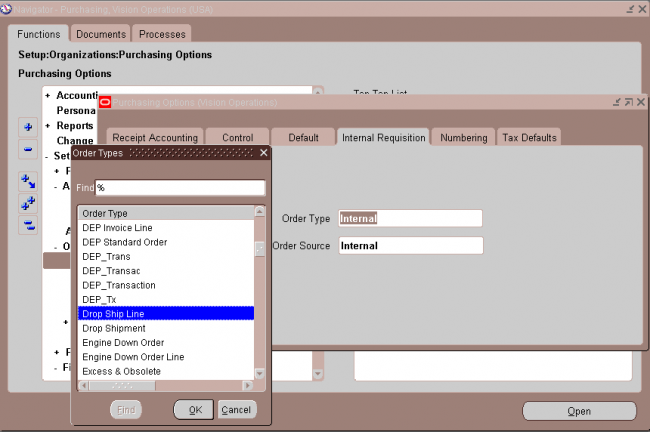
Order types are defined in Order Management. The order type you choose here is the type that Purchasing uses to create sales orders from internal requisitions.
2. Select the default Order Source for internal requisitions.
Purchasing defaults and only uses Internal. This is the source Order Import uses to transfer internal requisitions from Purchasing to Order Management.
Attention:
i. The following two fields are enterable only when the form is accessed from the Purchasing menu.
ii. The Order Type field is visible only if the application Oracle Order Management is installed.
Defining Numbering Options
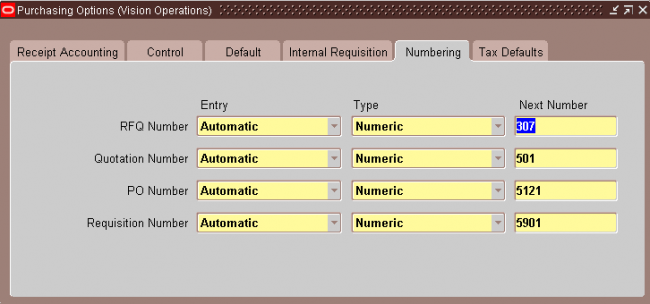
Purchasing numbers requisitions, purchase orders, quotations, and RFQs within operating units in a Multi–Org setup. So, for example, Purchasing allows the same requisition number to be used by different operating units.
Purchasing also numbers receipts within inventory organizations rather than across inventory organizations. So, for example, the same receipt number could be used by different inventory organizations. To define receipt numbering options, see Defining Receiving Options.
1. Select the [Document] Number Entry method for RFQ, quotation, purchase order, and requisition numbers:
Automatic: Purchasing automatically assigns a unique sequential number to each document when you create the document.
Manual: You provide a document number manually when you enter the document.
Attention :
You can change the method of entering document numbers at any time. If you originally allow manual entry and switch to automatic entry, make sure to enter a Next Number that is higher than the highest number you assigned manually.
2. Select the [Document] Number Type you want Purchasing to use for RFQ, quotation, purchase order, and requisition numbers:
Numeric or Alphanumeric.
Attention :
i. You can change the document number type from Numeric to Alphanumeric whenever you want. You can change the document number type from Alphanumeric to Numeric only if all your current document numbers are numeric.
ii. If you choose Automatic document number entry, you can generate only numeric document numbers, but you can still import either numeric or alphanumeric values from another purchasing system.
iii. If you import purchasing documents from a foreign system that references alphanumeric numbers, you must choose Alphanumeric as your number type, regardless of your numbering method.
3. Enter the Next Number. This is the starting value you want Purchasing to use for generating unique sequential document numbers if you choose Automatic document number entry. Purchasing displays the next document number that will be used for a new document when you create the new document. You cannot enter this field if you choose Manual document number entry.
If you use Master Scheduling/MRP, Inventory, Work in Process, or any non–Oracle system to create requisitions automatically, you must also let Purchasing number the corresponding requisitions automatically.
Purchasing Option in R12

Select RFQ Required to require an RFQ for an item before you can autocreate the corresponding requisition line onto a purchase order. You can override this value for each item or requisition line.
Purchasing documnet Type
I want To update Purchasing document Type and Document number for those documents but these documents are not there or not displayed For some operating unit. Please Help me